What is a squeezeback?
You have seen this on TV even if you did not know the name. A news anchor is talking, and the camera feed smoothly shrinks into a box in the corner while a graphic fills the rest of the frame. That move is called a squeezeback (or a DVE squeeze, if you want the technical term).
OBS does not have one built in. You get cuts, fades, slides, and that is about it. OBS Squeezeback is a plugin that adds a zoom filter for this kind of animation.
What it does
You apply the Squeezeback Zoom filter to a scene. The scene has a video source (camera, capture card, NDI feed) plus whatever graphics you have arranged around it: lower thirds, tickers, logos. When the scene goes live, it starts fully zoomed into the video source so the camera fills the screen. Then it smoothly zooms out to show the full layout.
The whole thing runs on the GPU, so it will not tax your CPU.
Installing
Windows only for now. macOS and Linux are on the roadmap.
- Grab the latest release from the tools page or from GitHub
- Run the installer. It finds your OBS install and drops the files where they need to go.
- Restart OBS
- Open Filters on any scene. You should see “Squeezeback Zoom” in the list.
If you have a zip instead of the installer, extract it into your OBS folder (C:\Program Files\obs-studio\). The obs-plugins and data directories should merge with the existing ones.
The Squeezeback dock
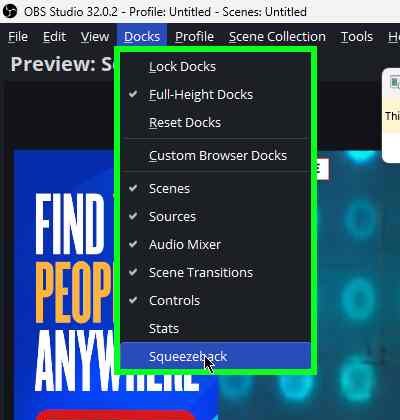
The plugin adds a dedicated dock panel to OBS. Open it from View > Docks > Squeezeback.
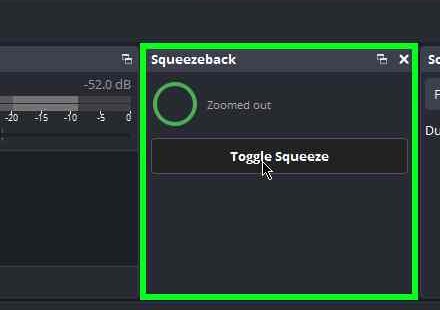
The dock gives you quick access to everything without opening the filter properties:
- Progress ring shows the current animation state. Gray during the delay countdown, green while animating, full ring when zoomed out.
- Duration and Delay controls let you adjust timing on the fly. Changes apply immediately to the active filter.
- Toggle Squeeze button triggers the animation, same as the hotkey.
The dock automatically tracks whichever scene has the Squeezeback filter active. Switch scenes and it follows. If no scene has the filter, the controls disable themselves.
Setting it up
The filter works best when your scene already has an L-shaped layout: a video source plus graphics around it. The idea is that viewers see the video fullscreen first, then the layout slides into view.
Adding the filter
- Build your scene with the video source and graphics positioned where you want them
- Right-click the scene (not the source) and select Filters
- Hit + and add Squeezeback Zoom
- Pick your video source from the Video Source dropdown
- The filter detects where your source sits on screen automatically. Hit Toggle Squeeze or press F9 to test it in the preview.
Settings
Duration is how long the zoom-out takes. Default is 0.8 seconds. Drop it to 0.5 for something snappier, or push it to 1.2 if you want a slower pull.
Delay is the pause before the animation starts. Default is 0.3 seconds, which gives the viewer a beat to register the video before things start moving. Set it to 0 if you want it immediate.
Easing controls how the motion feels:
- Linear: constant speed, no acceleration. Rarely what you want.
- Out Cubic: smooth deceleration. This is the default and works for most situations.
- In-Out Cubic: gentle start and gentle finish.
- Out Expo: fast start, dramatic slowdown. Snappy.
- Out Back: overshoots the target slightly before settling. Adds a bounce feel.
Auto-animate on scene activation is on by default. The animation fires every time the scene goes live. Turn it off if you would rather trigger it yourself with the hotkey.
You can also adjust Duration and Delay directly from the dock panel without opening filter properties.
The hotkey
Default is F9. You can change it in Settings > Hotkeys > “Squeezeback Toggle”. It toggles between zoomed-in and zoomed-out, regardless of whether auto-animate is on. You can also trigger it from the dock’s Toggle Squeeze button.
Pairing it with Vies
If you are using Vies for NDI scripture overlays, the zoom filter works well alongside it.
Set up a scene with your camera, an L-shaped frame, and a Vies NDI source for verse text. When the scene goes live, the camera fills the screen, then the zoom pulls out to reveal the frame. When the minister references a verse, the overlay appears on top of the graphics. Both happen automatically.
Recommended settings
Subtle reveal. Duration 1.0s, delay 0.3s, Out Cubic. The camera fills the frame on cut, then slowly pulls back. Good for church broadcasts and corporate events.
Snappy reveal. Duration 0.5s, delay 0.1s, Out Expo. Fast start, smooth stop. Works for news-style setups.
Dramatic overshoot. Duration 0.6s, delay 0.1s, Out Back. The zoom pulls out fast, overshoots, bounces back. Better for high-energy shows or event intros where you want the reveal to have some weight.
Troubleshooting
Plugin not appearing. Check that the DLL is in C:\Program Files\obs-studio\obs-plugins\64bit\ and the data files are in C:\Program Files\obs-studio\data\obs-plugins\squeezeback\. Restart OBS.
Filter not finding the video source. Make sure the filter is on a scene, not on an individual source. The video source has to be inside that scene. If you renamed the source after setting things up, reselect it in the dropdown.
Choppy animation. Turn on hardware acceleration in OBS Settings > Advanced > Video. The filter uses GPU shaders and needs hardware rendering.
Hotkey not working. Check Settings > Hotkeys, search for “Squeezeback Toggle.” Make sure nothing else is bound to the same key.
Graphics leaking through when zoomed in. When the video source should be filling the entire screen, you might see a thin strip of your graphics peeking through on one edge (usually the left or bottom).
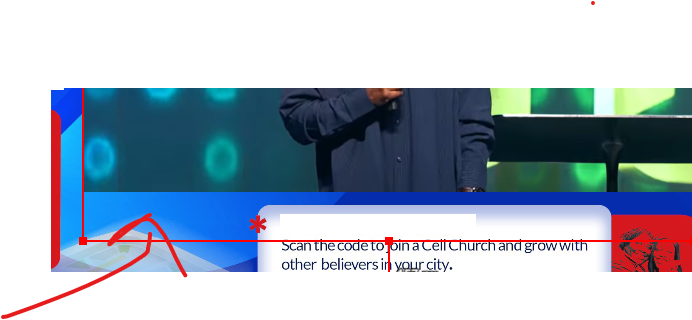
This happens because the filter calculates the zoom range from the OBS bounding box of your video source. If you resized the source by dragging without holding Shift, the bounding box ends up larger than the visible video. The filter zooms to fill the bounding box, not the screen, so the edges don’t quite reach. To fix this, select your video source, hold Shift, and resize it so it snaps to the correct proportions. The bounding box (the dotted outline in the preview) should tightly wrap the source with no extra padding.
Auto-animate not firing on program. Confirm “Auto-animate on scene activation” is checked. If you are in Studio Mode, Duplicate Scenes needs to be enabled for the animation to play on the live output.
Links
- Download OBS Squeezeback
- Source code and issues on GitHub
- OBS Connection Manager - companion plugin that keeps your stream alive when bandwidth wobbles
- Streaming Bible verses via NDI in OBS
- Getting started with Vies